Saturday, April 21, 2012

2012 Hop Garden(s)

We are still expanding...

I went a little overboard on the hops this year. But I guess that is expected for someone living on the West Coast. I actually don't use very many hops over the course of the year, maybe ~ 1 lb for my 12 brew sessions. I do however really like experimenting and being able to grow your own hops is a fun thing for me (and friends).

This year we are growing at 5 different locations
- My Mom's (4 plants - 3 varieties)
- My Dad's (2 plants - 2 varieties)
- Dan's (7 plants - 7 varieties)
- Dan's Mom (TBD)
- Eric's (3 plants - 3 varieties)

Mom's
Fuggles
04.05.12

Goldings
04.05.12

Sterling
04.05.12

Dad's
Cascade
04.03.12


Tettnanger
04.03.12


Dan's
Cascade
04.15.12

Centennial
04.15.12

Chinook
04.15.12

Cluster
04.15.12

Magnum
04.15.12

Nugget
04.15.12

Willamette
04.15.12


Eric's
Cascade
04.06.12

Chinook 
04.06.12
Willamette

I'll post updates through out the year (~ once a month). And we should have a good number and variety of rhizomes to give out next spring. Leave a comment if you are interested in some rhizomes and I will contact you when they are ready.

Tuesday, April 17, 2012

The Great Wood Aging Experiment: 7 Varieties

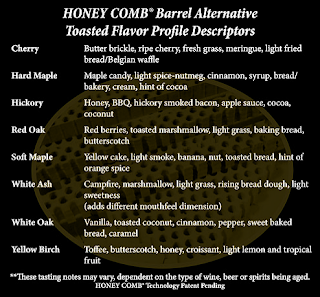
This experiment was inspired by a post I read at local beer blogger site, Lewy Brewing. He bought some oak "honeycomb" inserts to use in his beers. I took a look through the Black Swam Barrels website and the below paragraph caught my attention:
I decided to buy one 5 gal honeycomb insert of each (except Hickory, not a big fan) and at $2/piece. You have to email them (heidi@blackswanbarrels.com) and then they will reply with a quote. They sent my samples within the week and then I mailed them a check.


I received 7 individually wrapped honeycomb inserts. For this experiment, I thought my Scottish 80/- would be a great base beer to test the flavors on. It has a nice malt backbone, but is not too strong to let us taste the difference in wood varieties. I made a 10 gal batch (5 in a carboy, 5 in a keg) and then transferred .5 gal from each fermenter into 7 - 1 gal jugs (the leftover was kegged and is in the fridge).


I had to cut the 5" sticks into a 1" cube so that it is the right dose for 1 gal. Then the cube was microwaved with filtered water for 3 min and allowed to cool before pitching the whole thing into the 1 gal jug. This process took a while, but I was catching up on episodes of Brewing TV.


Now, it is time to wait 6 weeks (suggested extraction time) and then the next chore of bottling 7 individual gallon jugs begins. The plan is to get a small group together to taste the beers and make some notes on each type of wood to see if we agree with what Black Swan Barrels described.


 So stay tuned for a future tasting post.

Friday, April 6, 2012

Homebrew Tasting - Muscat Confluence

I have finally got around to tasting one of my first ever dreg beers. And it was worth the wait.

Allagash Confluence was one of the first truly Brett Beers I've ever had. I remember the experience very well, my good friend Ben bought me a 2009 Confluence for my birthday. We shared it that night and I recall being blown away with how the flavor changed with each sip as the beer warmed up. I was hoping to accomplish something similar, with using a very simple Belgian Singel base wort and letting the yeast be the main focus. After about 6 months, I wasn't too impressed (with my experience now, I probably wouldn't have touched it) so I added a 750 ml bottle of Muscat grape juice. This grape is popular in sweet dessert wines and I really like the taste and aroma.

This beer is already pretty old, but I am looking forward to occasionally tasting this beer and seeing how it changes.

Wednesday, April 4, 2012

Undercover San Luis Obispo: Bishop's Peak + Cave

This is honestly one of my favorite trails to hike (and I have done some famous hikes through Zion, the Sierras and Grand Canyon). The trail is well maintained and has several hiking options depending on your mood (It is however a well-used trail, and that is either a plus or minus to you). The view from the top changes so dramatically depending on weather and the season. I won't go into too many specifics about the hike because there are already great resources out there (Sierra Club, City of SLO). What I will do is give some commentary on hiking options and comment on some lesser known points on the trail.


View Bishop Peak Features in a larger map

There are 3 main trail-heads:
Patricia Dr - Easily accessed from the surrounding neighborhood. The initial switchbacks will get you nice and warmed up. This way will add an extra 300 vertical ft and .5 mi each way Vs. the Highland Dr Trail-head.

Top of Highland Dr - I call this the cheater's start, but is probably the best option if your roommate is making you hike with a hangover. You get to still see the nicest areas of the hike, but you cut off some distance and vertical climbing. Parking can be tough on the weekend.

Foothill Blvd - Easily the toughest way to go. You will have no shade and the trail is quite steep. If you are looking for just a good work-out this the way to go.

Extras:
Bouldering and Climbing - Bishop Peak has quite a few great spots for multiple types of climbing. Everything from Bouldering to Trad to Top Roping. The bouldering area is located in the woods near the Highland Dr trail-head and also out in the meadow by the seasonal lake. See the map above for details. And thanks to generous climbers there is a public Bouldering Guide for Bishop Peak and a Climbing Guide for Bishop Peak.

Bishop Peak Cave / Mine - Hiking from either the Patricia Dr or Highland Dr trail-heads you can access the cave. When you are on the main trail and pass through the cattle gate, the cave is located behind the bushes on your right. View the map above for the precise location. The cave entrance is a bit small, but it opens up to an awkward crouching height. The cave is also polluted with tea candles from years of students having parties in the cave. The cave is several hundred feet long with a few tall areas. Make sure to bring lights and clean-up after yourself.


Bishop Peak Summit Rock Cave - For the lack of a better word there is a rock cave located near the summit. Once you have reached the summit, if you take the trail to your left (West), you will eventually (avoid poison oak and scrambling on some rocks) see a small opening to climb down into the rocks. The "cave" is a great shaded area to rest and enjoy the view of Cerro San Luis Obispo.


Related Posts Plugin for WordPress, Blogger...